Thursday, December 25, 2008
Guns n' Roses still rock
Went to Landmarks, MG Road, Pune on Christmas day and say big posters of Chinese Democracy but could not locate the CDs. After asking the staff turns out that they are all sold out. Sure I was sad I could not get my copy but I was also quite happy, after all these years Gn'R (my favorite band since school days) still kicks ass and manages to sell out 100%.
Saturday, December 13, 2008
Setting up a wireless network with DLink DER 300 and Airtel broadband
Setting up home networks can be either a total pleasure or a total pain; there are no in-betweens.
Here is an east step by step instruction so you have a ‘total pleasure’able experience.
I am assuming:
The Airtel DSL router has it’s IP set to 192.168.1.1
The DLINK router’s IP is set to 192.168.0.1
Step1:
While still connected to the airtel DSL directly, log into the Airtel DSL router’s administration website using your favorite browser: http://192.168.1.1
- Enter the user-id and password. The default one is ‘admin’ for login and ‘password’ for password.
- Now click the ‘LAN’ link on the left side of the web-page.
- Select the ‘Disable DHCP Server’ as shown below:

Click Save.
Step 2:
Remove the network cable which connects the Airtel DSL router to your PC from your PC and connect it to the socket marked ‘Internet’ on the DLink router.
Step 3:
Connect your PC to one of the LAN ports of the DLink router using the supplied LAN cable (supplied with the DLink router).
Bring up the Command Prompt in Windows by typing cmd in the Programs…Run menu. Now type: ping 192.168.0.1
Your screen should look something like this:
C:\Documents and Settings\Siddharth.PIXIE.000>ping 192.168.0.1
Reply from 192.168.0.1: bytes=32 time=20ms TTL=64
Reply from 192.168.0.1: bytes=32 time=20ms TTL=64
This means that your DLink router is connect properly to the PC.
Step 4:
Now to setup the PC’s network properties:
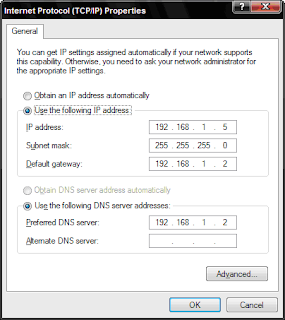
You can specify an IP address starting from 192.168.1.3 to 192.168.1.255.
Just make sure you don’t give 192.168.1.1 or 192.168.1.2 as these will be used by the routers.
Step 5:
Configure the DLink router Open the following URL in your favorite browser: http://192.168.0.1
Enter the user name as admin. The default password is blank so just leave it empty.
Disable DHCP:
In the next screen, click the “LAN Setup” from the left side of the website. I usually disable DHCP so that is what I am going to suggest here. In the “Enable DHCP Server” checkbox is checked, uncheck it.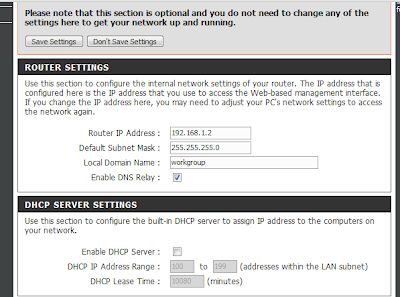
Here is an east step by step instruction so you have a ‘total pleasure’able experience.
I am assuming:
The Airtel DSL router has it’s IP set to 192.168.1.1
The DLINK router’s IP is set to 192.168.0.1
Step1:
While still connected to the airtel DSL directly, log into the Airtel DSL router’s administration website using your favorite browser: http://192.168.1.1
- Enter the user-id and password. The default one is ‘admin’ for login and ‘password’ for password.
- Now click the ‘LAN’ link on the left side of the web-page.
- Select the ‘Disable DHCP Server’ as shown below:

Click Save.
Step 2:
Remove the network cable which connects the Airtel DSL router to your PC from your PC and connect it to the socket marked ‘Internet’ on the DLink router.
Step 3:
Connect your PC to one of the LAN ports of the DLink router using the supplied LAN cable (supplied with the DLink router).
Bring up the Command Prompt in Windows by typing cmd in the Programs…Run menu. Now type:
Your screen should look something like this:
C:\Documents and Settings\Siddharth.PIXIE.000>ping 192.168.0.1
Reply from 192.168.0.1: bytes=32 time=20ms TTL=64
Reply from 192.168.0.1: bytes=32 time=20ms TTL=64
This means that your DLink router is connect properly to the PC.
Step 4:
Now to setup the PC’s network properties:

You can specify an IP address starting from 192.168.1.3 to 192.168.1.255.
Just make sure you don’t give 192.168.1.1 or 192.168.1.2 as these will be used by the routers.
Step 5:
Configure the DLink router Open the following URL in your favorite browser: http://192.168.0.1
Enter the user name as admin. The default password is blank so just leave it empty.
Disable DHCP:
In the next screen, click the “LAN Setup” from the left side of the website. I usually disable DHCP so that is what I am going to suggest here. In the “Enable DHCP Server” checkbox is checked, uncheck it.
In the Router settings section specify the following details:

Click ‘Save Settings’.
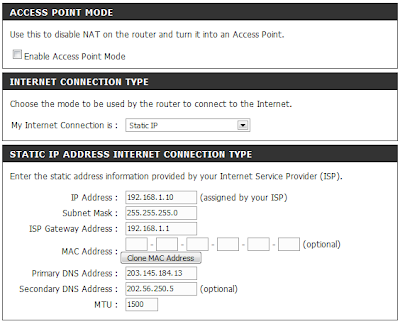
Internet connection:
Click the “Internet Setup” link from the left side of the web-page.
Click the “Manual Internet Connection Setup” button.
In the next screen, set the ‘My Internet Connection is’ as ‘Static IP’. The properties should look like this:

Click ‘Save Settings’.

Subscribe to:
Posts (Atom)