Here is an east step by step instruction so you have a ‘total pleasure’able experience.
I am assuming:
The Airtel DSL router has it’s IP set to 192.168.1.1
The DLINK router’s IP is set to 192.168.0.1
Step1:
While still connected to the airtel DSL directly, log into the Airtel DSL router’s administration website using your favorite browser: http://192.168.1.1
- Enter the user-id and password. The default one is ‘admin’ for login and ‘password’ for password.
- Now click the ‘LAN’ link on the left side of the web-page.
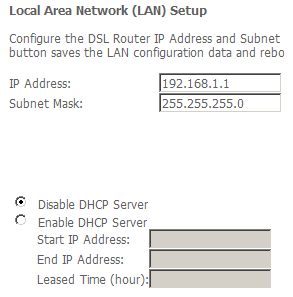
- Select the ‘Disable DHCP Server’ as shown below:

Click Save.
Step 2:
Remove the network cable which connects the Airtel DSL router to your PC from your PC and connect it to the socket marked ‘Internet’ on the DLink router.
Step 3:
Connect your PC to one of the LAN ports of the DLink router using the supplied LAN cable (supplied with the DLink router).
Bring up the Command Prompt in Windows by typing cmd in the Programs…Run menu. Now type:
Your screen should look something like this:
C:\Documents and Settings\Siddharth.PIXIE.000>ping 192.168.0.1
Reply from 192.168.0.1: bytes=32 time=20ms TTL=64
Reply from 192.168.0.1: bytes=32 time=20ms TTL=64
This means that your DLink router is connect properly to the PC.
Step 4:
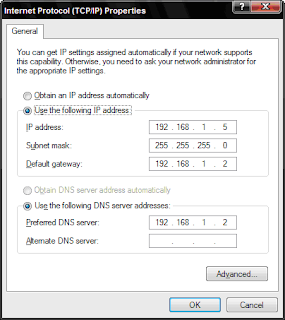
Now to setup the PC’s network properties:

You can specify an IP address starting from 192.168.1.3 to 192.168.1.255.
Just make sure you don’t give 192.168.1.1 or 192.168.1.2 as these will be used by the routers.
Step 5:
Configure the DLink router Open the following URL in your favorite browser: http://192.168.0.1
Enter the user name as admin. The default password is blank so just leave it empty.
Disable DHCP:
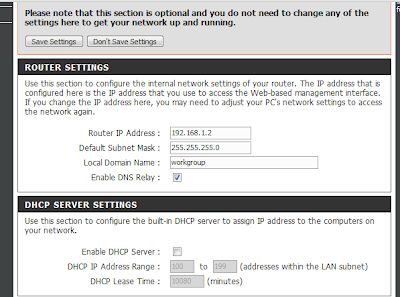
In the next screen, click the “LAN Setup” from the left side of the website. I usually disable DHCP so that is what I am going to suggest here. In the “Enable DHCP Server” checkbox is checked, uncheck it.
In the Router settings section specify the following details:

Click ‘Save Settings’.
Internet connection:
Click the “Internet Setup” link from the left side of the web-page.
Click the “Manual Internet Connection Setup” button.
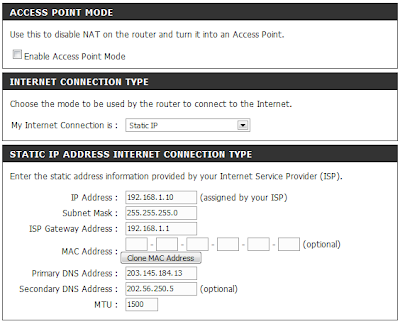
In the next screen, set the ‘My Internet Connection is’ as ‘Static IP’. The properties should look like this:

Click ‘Save Settings’.

1 comment:
Can anyone recommend the well-priced Remote Management utility for a small IT service company like mine? Does anyone use Kaseya.com or GFI.com? How do they compare to these guys I found recently: N-able N-central desktop support
? What is your best take in cost vs performance among those three? I need a good advice please... Thanks in advance!
Post a Comment